At times, data engineers and data scientists find themselves needing fast, automated processes to load their files into Snowflake, including a centralized point for other people to drop files. However, other coworkers might not have all the access they need to create certain tables, or you might be looking for a way to unify your query data without a large volume of tables.
That’s where the schema on read process comes into play. And all you need to implement this process is Snowflake and an S3 bucket.
The following image explains the proposed architecture:
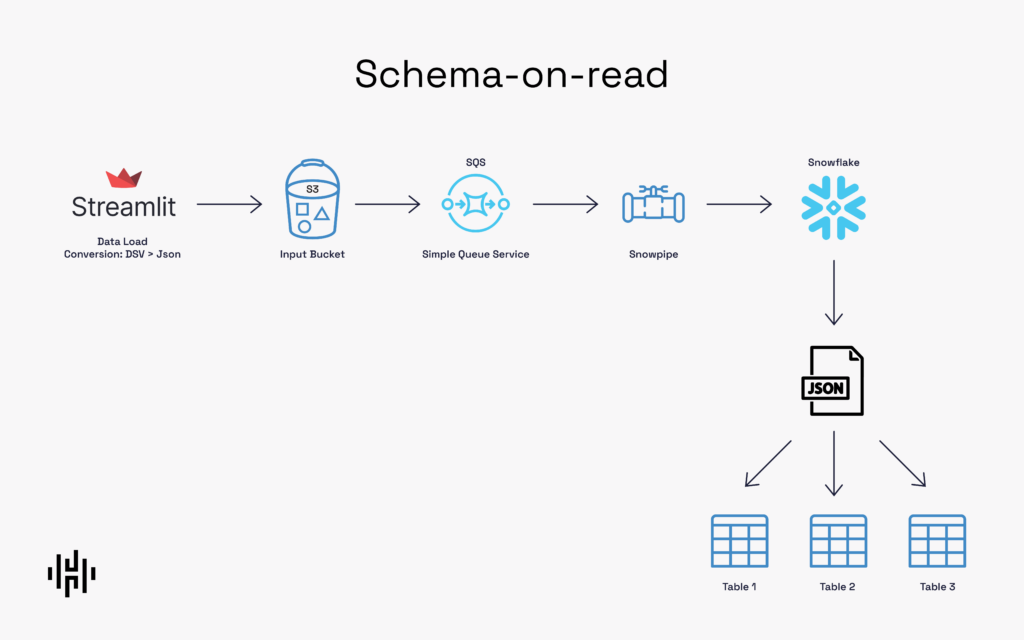
In this post, we’re going to build a process that enables every file dropped in an S3 bucket to be automatically sent to Snowflake. Once in Snowflake, it’s dropped as a variant row in one of our tables. The final result is a single, unified table in Snowflake that contains all of our tables in S3.
In order to make this work, we need to follow three steps in Snowflake:
Step 1
Define the role, warehouse, database and schema where I want to create my table. Then, create the table. In this case, I named the table JSON_TABLE and defined the JSON Format.
					USE ROLE SYSADMIN;
USE WAREHOUSE COMPUTE_WH;
use database DEMO_DB;
use schema PUBLIC;

CREATE OR REPLACE TABLE JSON_TABLE
(
  File_TS timestamp default current_timestamp(),
  File_NM VARCHAR,
  FILE_VARIANT VARIANT

);

create or replace file format JSON_FORMAT
type = json;
Step 2
Create the stage. This step requires your AWS keys and an S3 bucket url.
					create or replace stage my_s3_stage url='s3://your_bucket_name/my_files/'
credentials=(aws_key_id='my_aws_key' aws_secret_key='my_aws_secret_key')
file_format = JSON_FORMAT;
Step 3
Create your pipe. What we’re doing here is setting auto_ingest=true so that every time there’s a file in AWS S3, it gets automatically ingested in Snowflake. In this case, we’re selecting the file name in one column and the content to be placed in another.
					create or replace pipe pipe_json auto_ingest=true as
copy into JSON_TABLE(FILE_NM,FILE_VARIANT)
from (select metadata$filename, *  from @my_s3_stage)
pattern='.*.json';
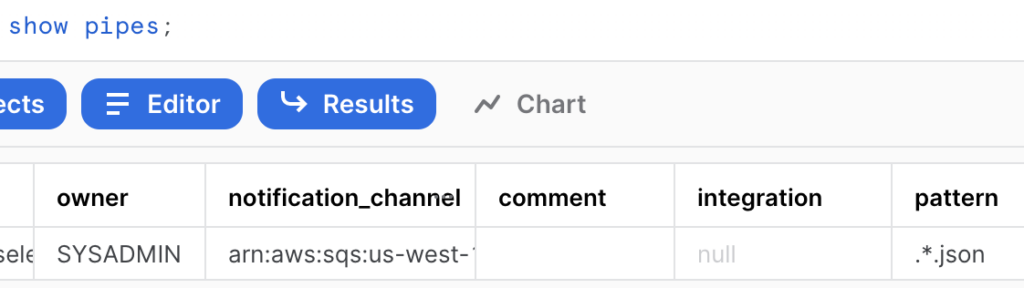
And that’s it! With those three steps, you now have an autoingest pipe process in Snowflake. The next step is to get the code in your pipe’s notification_channel and input that in the notification AWS SQS Queue section.
To do that, you run the “show pipes;” command in Snowflake.
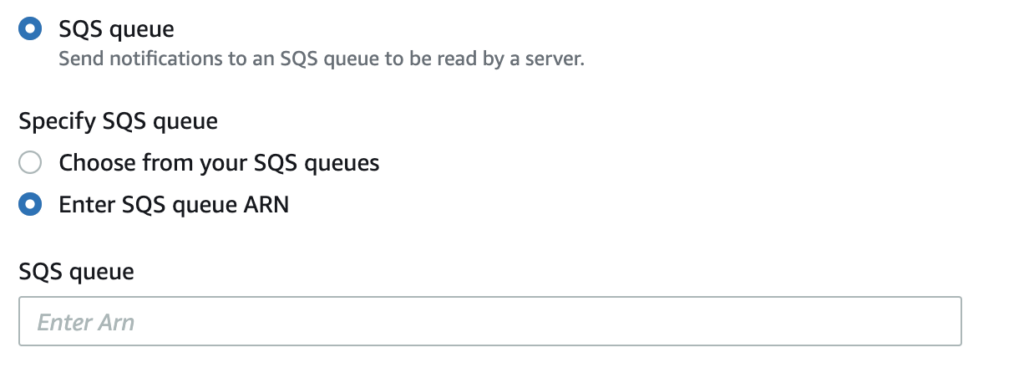
Once that step is completed, look for the notification_channel code, go to your S3 bucket properties and look down for “Create notification channel” option. There, you give it a name, select “Put”, and look for the SQS option at the very end. Select the “Enter SQS queue ARN” to place the notification channel code.
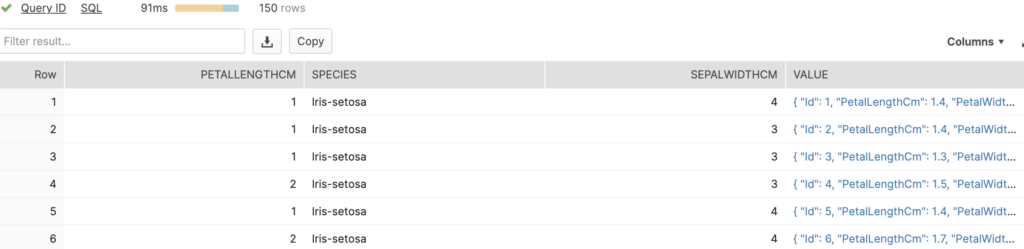
With the S3 bucket connection set up, our Snowflake table will show the following every time we drop a JSON file.

As you can see, I’ve dropped a version of the famous Iris dataset and a Housing dataset. The coolest part of this process is that I have several tables inside a single Snowflake table, and I did this without having to define a specific schema for each!
You can drop any file with any amount of columns and rows and it will be ingested without any problems as long as it is within the allowed row size, but even if it goes over, there’s workarounds.
With a simple query, I can get my data, work with it, and even create a new table.
					--Create or replace table as Iris (optional)
select
c.value:PetalLengthCm::Integer as PetalLengthCm,
c.value:Species::STRING as Species,
c.value:SepalWidthCm::Integer as SepalWidthCm,
value
from DEMO_DB.SCHEMA_ON_READ.JSON_TABLE
, lateral flatten( input => FILE_VARIANT) c
where FILE_NM='json/Iris_dataset.json' ;
Now, this is how it looks when I define data types on the fly.
Great! So far, we’ve covered ingestion of JSON files. However, when doing data analysis, having our files in CSV format is exceedingly common. If you want to convert them to JSON files, you can do so manually and drop them in S3.
Another option is to use a Lambdas script to convert the files and put them in your output bucket. However, that’s a bit tedious and still requires a lot of work, like getting into AWS yourself and placing the files. After two or three times uploading files using this option, you’ll want to look for a way to load many of them at once.
Too Long, Didn’t Read
In this tutorial, you learned how to load seed files into Snowflake automatically and without defining the table schema every time. This process can help you save space and time, as you avoid constantly going through a request process with the department that holds the “keys” to your Snowflake data warehouse.
If you don’t have the necessary access to be constantly creating files for you or your team, this is a very convenient solution for any data analysis and Data Science modelling process.
I hope you enjoyed the tutorial as much as I did creating it! At Hakkoda, we are constantly creating data tools and processes to help get our customers create business value faster. Contact us to learn how to implement unique insight accelerators for your business and achieve more with the modern data stack.